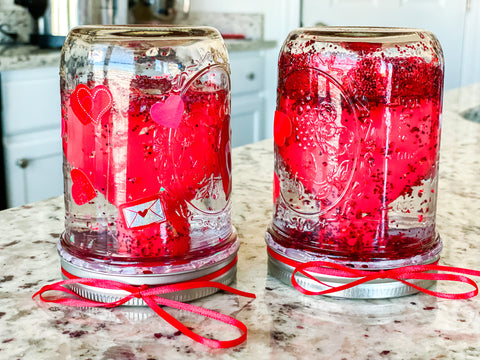
Did you love snow globes as a child? I definitely did! And now my kids absolutely love them too. It is always so fun for me to watch them and see the wonder in their eyes as they, themselves watch the snow and glitter fall inside the globe.

I took our love of snow globes and put a fun DIY Valentine’s Day spin on it! Enjoy making your own Valentine’s Day Snow Globe at home.
Items you need:

- mason jar
- Valentine’s trinket (I used the heart shape from the top of a candy-filled cane)
- glitter
- foil confetti
- glycerin
- Mod Podge or Super Glue
- hot glue gun
- ribbon
- stickers
To create your Valentine’s Day Snow Globe:
1.) Use a hot glue gun to glue your Valentine’s trinket to the inside lid of the jar. When selecting a jar, make sure that the mouth of the jar is wide enough for your trinket to fit inside.

2.) Fill the jar with glitter and confetti. With this step, less is more. My son dumped quite a lot of glitter into his jar and my daughter just used a little and her snow globe actually works better. My son’s globe is hard to see through since he has so much glitter.
3.) Add water to your jar, but do not fill it all the way up. (Note: when you eventually get to step #6 below where you secure the lid on the snow globe, the trinket will take up space in the jar causing the water to rise, so make sure to leave some space without water.)
4.) Add a few drops of glycerin to the water. This will help the glitter and confetti not clump together.
5.) Apply Mod Podge or Super Glue to the inside ring of the jar lid. I chose Mod Podge since Super Glue dries very fast.

6.) Secure the lid on the jar as tight as you can. I even asked my husband to give it an extra twist to make sure it was on tight.

7.) Apply hot glue to the underside of the lid to create a nice seal.
8.) Add stickers to the outside of the jar to decorate it. I found tons of stickers with adorable hearts that were perfect for this. Pro Tip: If you still have your jar right side up (with the lid on top and the jar touching the counter), make sure to apply your stickers upside down. You will eventually flip your jar over to make the confetti and glitter fall.

9.) Add a ribbon around the jar lid for a bit more decoration.

10.) Flip it over, shake it up and enjoy your cute Valentine’s Day craft!

We hope you love this craft as much as we did! Be sure to share your crafts/DIY's and tag Decocrated :)

XOXO, Lindsay (Pursuit of Pink Blog)
For home decor inspiration and styling tips, follow me at the links below.Pursuit of Pink Blog: www.pursuitofpink.com
Instagram: https://www.instagram.com/lindsaytolar/
Facebook: https://www.facebook.com/PursuitofPink
About Lindsay and Pursuit of Pink:
Pursuit of Pink is a place where women can come to gain inspiration for home décor and life. Through this blog, I hope to help you create a home and life that you love. I designed this space to offer you tips and tricks on making life a bit easier to navigate. Life can be messy and hard; I want to come along beside you and offer resources to lessen your load. It is my heart to give you a place of positivity that encourages you, lifts you up, and helps build confidence in who you are as a woman.