Hey there! It’s Crystal, the Queen of Hacks here! If you follow the #DecoHacks Facebook page you have probably seen me there more than once. I’ve been a Decocrated subscriber since June 2020. As soon as I got my first box I went straight to Facebook and joined The Decocrators, Decocrated Marketplace and the #DecoHacks groups. 


I was instantly hooked on the #DecoHacks page! I thought it was exciting enough to get a box of new decor items four times a year, but wait, what, people are changing the items?! I’m a crafter and a do it yourselfer at heart and am always looking for new inspiration. I found the whole idea of “hacking” the box items intriguing! While I love the items in every box, they don’t always fit with my decor. Some people sell the items they can’t use on the Decocrated Marketplace or other selling platforms. Personally, I like to keep everything thinking I’ll find a use for it someday. 


My first hack was to make a storage basket out of the Summer 2020 rug. The rug popped into my head as I was watching some how-to videos on Facebook. YES! I found a new purpose for that cute rug that I had stuffed in a closet! I was glad I had kept it! When I posted my hack on the #DecoHacks page I got a lot of positive reactions. Everyone in the group is so complimentary and encouraging. And you don’t have to be a master crafter to “hack” an item. Whether you’re doing something simple like displaying an item in your own creative way, or something more complex involving painting or disassembling an item to make it your own, the members of this group will make you feel like a genius! If you’re at a loss for styling items from your box or thinking about selling an item because it’s not your style, go to the #DecoHacks group for some inspiration first. And posting your own ideas might just inspire someone else to try something new!


While it’s fun to repaint and change the look of something, I really get excited when I can find an entirely different purpose for an unpopular item. Like the burlap shopping bag from Spring 2020 that I turned into wall art. Or the perpetual calendar from Winter 2020 that I turned into a photo cube box with a variety of photos and designs that I can change anytime I want! 


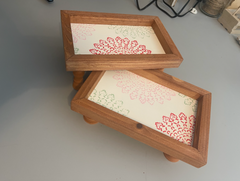
The Spring 2021 box did not disappoint, but I don’t have any wall space for the two framed flower prints so my gears started turning. As I held the items and looked at them from all sides and different angles looking for an idea, the lightbulb went off! I can turn these into jewelry trays! Yay! And my idea grew from there. I’m going to take you through the steps to recreate the jewelry trays in the exact style that I did, but the ways to customize this hack are endless! Don’t want to get too involved with disassembling and painting, then just stop at adding the legs. These would be just as pretty with the original artwork in them. Maybe you would prefer a white-washed look, go for it! Don’t like the stencil or the colors I used, go wild with your own ideas! The possibilities are limitless!


Framed Flower Prints Hack


What you’ll need:

  • The two framed flower prints from the Spring 2021 box
  • 4 unfinished wood candle cups 1-7/8” or similar for the shorter tray
  • 4 unfinished wood candle sticks 3” or similar for the taller tray
  • Apple Barn acrylic paint in Chestnut
  • Paint brush
  • Paper towels
  • Small phillips head screwdriver
  • Wood glue
  • Pliers
  • Hammer
  • Stencil
  • Acrylic paints in colors of your choice
  • Makeup sponges
  • Acrylic matte spray finish


Optional for durability on tray bottom

Steps 

  1. In a small cup, mix a small amount of the chestnut paint with water, approximately 1:1, mix well adjusting amount of paint/water as needed to make the mixture the consistency of water. This will act as a stain for the unfinished wood to match the stain of the picture frames.
  2. Apply the paint mixture to the unfinished wood legs with a brush, then use a paper towel to wipe it off before it dries. 
  3. To remove the picture from the frame, slowly push on the picture right up against the frame using firm pressure. Take your time to minimize damage to the edges of the picture. If you do happen to end up with large chips or peeling along the edges you can use wood glue or wood filler to repair these. 
  4. Using the small phillips head screwdriver, remove the sawtooth hanger from the back of the frame.
  5. Using pliers, remove nails that are sticking out of either the picture or the frame and set these aside for later. You’ll reuse the nails when you put the trays back together.
  6. Sand the edges of the picture to smooth out the places where the nails were. You can also sand over the image of the flowers so they won’t show through if you will be using white paint for the bottom of your trays. 
  7. Apply a couple coats of white acrylic craft paint until the original image is totally covered and allow time to dry. I used Folk Art Ivory White Matte. The painted surface needs to be very smooth to prevent paint seeping under the stencil. If the texture is a little rough after painting you can lightly sand over it with a fine grit sandpaper. 
  8. Apply stencil of your choice. I used a mandala stencil from DecoArt that I got at Michaels. The colors I used for my stencils are Craft Smart Light Pink, Folk Art Villa Green and Fire Coral. I like to use a spray adhesive for my stencil to hold it in place and it helps prevent paint seepage under the stencil. I use Easy Tack Repositionable Adhesive Spray by Krylon. 
  9. Carefully apply paint over the stencil. I use a makeup sponge to dab the paint on a little at a time, layering until I’m happy with the color. Makeup sponges create a smooth finish and are easy to use. Be careful not to overload your sponge or you may get some paint under the stencil.
  10. Allow your stenciled image time to dry then spray with a protective finish or varnish. For this project I used Plastercraft Acrylic Matte Spray Finish.
  11. Now you can reassemble your art with the frames. Use wood glue on the inside edge of the frame. It just takes a little as wood glue creates a very strong bond and you don’t want to have a lot of excess running out around the frame. 
  12. Hammer the nails into the back of the frame just like they were when you disassembled them.
  13. Now it’s time to attach the tray legs. Apply wood glue to the large end of each leg, turn the frames face down, put the legs in the desired position, wipe off any excess glue and allow time for the glue to set. Follow the directions on the glue bottle. 
  14. Once the glue has dried, you can use the trays as is or you can add a layer of epoxy resin to make the bottom more durable against sharp objects and scuff marks. I use Puduo Epoxy Resin. It’s odor free and easy to use. Follow the directions that come with the kit. 
  15. Once the resin cures your beautiful jewelry trays are ready to use!


I hope you enjoy this hack and have fun adding your own style. For more creative inspiration, join the #DecoHacks group on Facebook and maybe I’ll see you there!