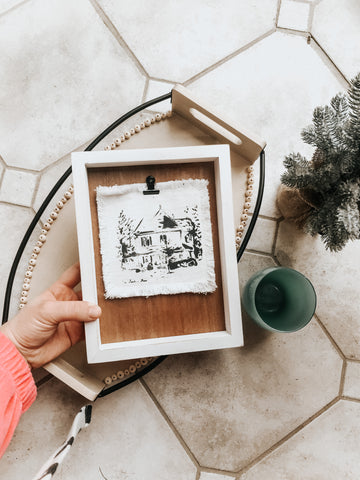
Hi friends! It’s Becca again from www.drivingmissmacey.com and I’m here to share another super simple DIY project you can do with your Winter 2021 wood tray!
I’m excited about this one because it takes minimal materials and minimal effort (which is exactly how I like my do-it-yourself projects)! As we all love and appreciate, our Decocrated pieces are amazing as-is but I love making subtle updates to them to really match them to the aesthetic of my own home! The wood tray was my absolute favorite item from the Winter 2021 box and I hesitated to even touch it with my DIY plans but this one was too intriguing not to try! Before we get too deep into the explanation, here’s what you’ll need:

⁃ Winter 2021 Wood Tray
⁃ Hot glue gun
⁃ Wood beads/or wood half-circles - any size you’d like. I used both 8mm and 10mm and needed about 50 of each.

I’m pretty obsessed with all things with wood beads: wood bead garland, mirrors with a wood bead border, and display trays with wood beads. I’m sure you all know what I’m talking about! I love how the wood beads create such an interesting look while still being neutral decor! I have made wood bead garland before, it was super easy (search 3 Ways to Repurpose your Decocrated Box here on the Decocrated blog and it should pop up)! When I saw the 2021 wood tray I knew it would be the perfect canvas for adding some wood bead details!

Here was my plan. I wanted to make a border of beads all the way around the base of the tray. I wanted this for two reasons: 1) I thought it would look great and, 2) it would also help create a ledge that would help keep smaller items from sliding off the tray!

I plugged my hot glue gun in, estimated the number of wood beads I would need by laying them out, then I got started! I ended up snagging an assorted bag of wood beads off Amazon because I wasn’t sure what size I wanted to go with. After seeing them on the wood tray, I decided to go with the smaller sizes. I alternated the 8mm size and the 10mm size. I liked the proportions the small beads gave rather than the larger beads, but you can use any size you’d like! Obviously, smaller wood beads took a bit more work just because you have more to glue down.

I also decided I was just going to put beads along the outside edges. You could continue all the way around or add some to the handle if you wanted. I kept it pretty simple.
Once you finish gluing down your beads - let dry, clean up all the hot glue strings (there were a lot of them!), then admire your work!! This is really such a quick and satisfying DIY. It really took the piece to the next level with just this simple change.

I styled it up for you a bit, what do you think? It looks pretty amazing right!? I love how sometimes the simplest changes can make a huge impact!
Thanks for coming along on this DIY transformation today! As always, let us know if you try it!
xoxo,
Becca
About the Author
Becca is in her early 30’s and lives just outside Seattle with her husband, whom she met on Tinder (crazy right!?), and her two kids Macey and Harrison. Life is pretty full with two young kids but in her “free time” Becca loves a good mani-pedi, a hike with her family in the beautiful Pacific Northwest, or a day-date to bubble tea with her daughter. You can find her on Instagram here: www.Instagram.com/drivingmissmacey or her blog: www.drivingmissmacey.com.